"Getting into Pictures" in Photoshop, Pt. 3
This is Part 3 of a 5-part series.
Today I'm going to show you how to clear away the unwanted background around the face in the photograph. To do this, you'll need to know the basics about layer masks. Normally, a layer completely obscures any layers that are beneath it (the stacking order is the order shown in the layer palette). So where we left off yesterday, the photo of Jane covers over the part of Mona Lisa that is beneath it. But Photoshop allows you to associate an optional "mask" with each layer. This mask indicates which regions of the layer will be transparent (showing through the content of the next layer below) and which will be opaque. A layer's mask is black & white, and is the same dimensions as the layer. Wherever there is white in the mask, the layer is opaque there, and wherever there is black in the mask, the layer is transparent. You can also think of painting black into the mask as "erasing" the content of the layer in those places so that the background shows through. But it's a non-destructive kind of erasing, because the layer image is still there.
Now let's create the layer mask. In the Layers palette, click to select the top layer which is the photograph ("Jane" in my example). Note: don't click on the "eye" icon beside the layer, as this will turn off/on visibility of the layer, but click on the thumbnail or text label of the layer. Now choose Layer > Layer Mask > Reveal All (or click on the "Add layer mask" icon (![]() ) at the bottom of the Layers palette). This creates a default mask that is all white. You'll see its thumbnail show up next to the layer thumbnail. Now be sure the layer mask thumbnail is the one that's active (there should be thicker lines around the four corners of it), as opposed to the layer thumbnail. This is a very subtle difference, but it's important, as it will ensure that you're painting only in the mask and not obliterating the image in the layer itself. The mask will be selected by default when you first create it, but get in the habit of verifying that the right item is active whenever you're about to paint in a layer or its mask. To activate one or the other, just click in the corresponding thumbnail.
) at the bottom of the Layers palette). This creates a default mask that is all white. You'll see its thumbnail show up next to the layer thumbnail. Now be sure the layer mask thumbnail is the one that's active (there should be thicker lines around the four corners of it), as opposed to the layer thumbnail. This is a very subtle difference, but it's important, as it will ensure that you're painting only in the mask and not obliterating the image in the layer itself. The mask will be selected by default when you first create it, but get in the habit of verifying that the right item is active whenever you're about to paint in a layer or its mask. To activate one or the other, just click in the corresponding thumbnail.
Now we're going to select the eraser tool (![]() ) to paint black onto the areas we want transparent. You could use the brush tool (
) to paint black onto the areas we want transparent. You could use the brush tool (![]() ) with black as your foreground color if you prefer, but it's equivalent to selecting the eraser tool with black as your background color. For now, let's use the eraser tool.
) with black as your foreground color if you prefer, but it's equivalent to selecting the eraser tool with black as your background color. For now, let's use the eraser tool.
To set foreground or background color, normally you'd click on the top or bottom swatch of color (foreground and background, respectively) in the color selection area of the Tools palette:  , and the Color Picker would come up. But for setting the colors for a mask, there's a quicker way. Simply click on the tiny icon of overlapping squares in the lower left of the color selection area in the Tools palette. This sets the foreground and background colors to their default settings, which for masks is always white and black, respectively. (It's the opposite for painting in layers.)
We'll also need to select an appropriate brush size to give us precise control over painting. (Even when working with the eraser tool, we still use the metaphor of painting, and have access to all of Photoshop's rich brush options.) We'll start with a large brush to paint (erase) the large areas of the mask roughly, but then we'll go down to a smaller brush for more precision in the details near the face. To select the brush size, click the Brush dropdown (the little triangle to the right of "Brush:") on the Options bar at the top of the Photoshop window. Choose the largest round brush you see there (it'll probably be 19 pixels), and then drag the Master Diameter slider over to the right to, say, 100 pixels. Keep the hardness at 100% for now. To make the dropdown go away, click anywhere outside it.
Now the fun begins. Just start painting (clicking and dragging the mouse) all over the background of the photograph where you want to erase it. When you start getting close to the face, you can reduce the size of the brush by hitting the left bracket key ([) multiple times. If you need to zoom in to be able to see the details better, you can press Ctrl-+ (Ctrl and the plus key) as many times as you need to (and use the scroll bars to go to the section that you want to focus on). Ctrl-- (minus) zooms you back out. Ctrl+0 (zero) zooms out to exactly the right size for showing the entire image. If you erase too much by mistake, don't worry. You can always paint white back over the areas where you goofed, by exchanging foreground and background colors (click the double-headed arrow near the color swatches, or press the X key).
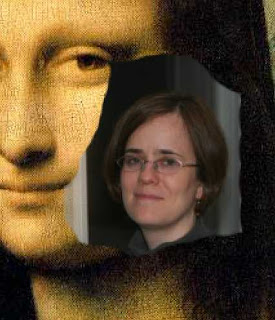
Don't get too detailed with masking around the face just yet, because we'll need to position the face better over the painting in order to see exactly what parts need to be erased. I'll leave you hanging on that until next time... In the meantime, save your work! Here's a detail of what mine looks like so far:
Go on to Part 4.


No comments:
Post a Comment